How to use phpGroupWare in OM
(Intranet & phpGroupWare)
Installation
-
php, mysql/postgresql, apache;
- create db user; create db;
- copy phpgroupware into DocumentRoot/groupware;
- change write access to root directory of phpgroupware so that header.inc.php can be written
- on workstation, http://SERVERNAME/groupware
-
todo: first install page; fill in the values like in ...
could be replaced by just writing a preconfigured header.inc.php
- Setup:
- create tables
- install applications
- create admin, but no demo accounts (show image)
- activate applications (what is necessary?)
Configuration
-
After installation, login as admin and go into the "Administration" application
(
 ).
).
- First create the user groups:

Create a group for each department in the office.
In this example, there is a group for all people working in the Carlisle office (all@carlisle),
a group for all IT people, which has two subgroups, the Linux Team and the Petra Team. The advantage of this is
that it helps to organise meetings of predefined groups because it is not necessary then to choose the single
attendants.
Creating a group:

You can select the applications that should be available for the members of this group. Only applications that were installed
in the setup are displayed here.
In this example, there are already existing users, so they can be chosen to be members of the team.
-
Before adding users, first set the default preferences
(as admin user in Preferences|Default Preferences|Preferences|Settings),
so that e.g. the id-society interface is the default.

-
Add users:

One user can belong to several groups. It is not necessary to select applications here, because the user should
belong to a group that has some assigned applications already.
-
Access rights:
If you edit a group, there is a new icon beside some applications, e.g. calendar:
 . Click this, and you see this screen:

This screen displays the access rights for the group Petra team.
In this example, all people are allowed to see the non private calendar items of the members of the Petra team.
Members of the Petra team are allowed to add new items to calendars of other members of the same team.
It is also possible to give special users special rights.
-
You can also select one or more group managers as soon as the group has some members.

- Resources:
There is no special resource management in phpGroupWare.
One approach to resolve this is to create a group "resources", with the different resources as users and members of this
group. The calendar application should be assigned to this group.
The access rights for the calendar of the resource group should be set to read for all@carlisle, and the users that
should manage the resources should get full rights.
The password for the resource account should be set, otherwise everyone could login to this account without using a password.
- Email settings:
Email is needed if changes to the calendar and alarms should be sent in emails to the normal account of the user.
As admin, go to "Administration/E-Mail/site configuration" and configure the SMTP server like this:

Then go to "Preferences/default preferences/email/email preferences...
is it necessary???
enable "Preferences/default preferences/calendar/preferences/Send: Receive updates via EMail".

The calendar application
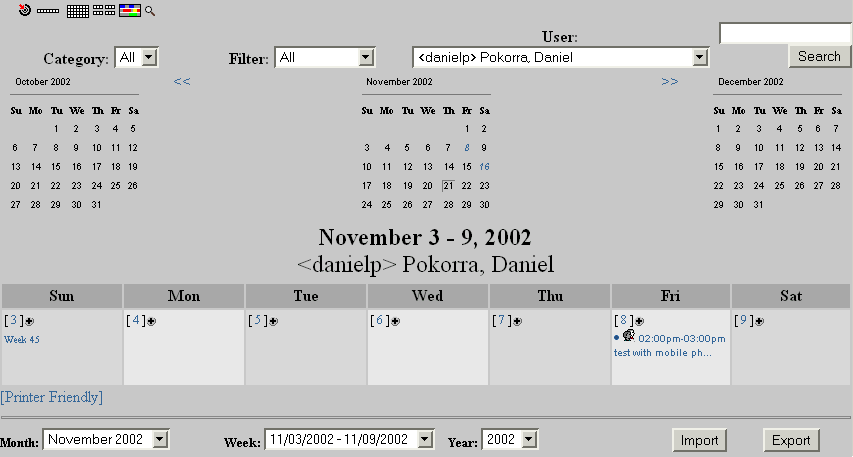
At the top, there are buttons for selecting the view. The calendar can show only one day with the single hours
( ), or show a complete week (
 ), or
a month (
 ) or a year (
 ).
In the example shown above, the calendar shows the week view.
With the symbol ( ) a daily matrix view can be displayed; see below for more information.
The planner ( ) also gives the possibity of showing the events of groups or single persons.
The categories are involved in that view, but we will not go into categories in this tutorial.
The "user" selection allows to choose either the calendar of a user or a group for which the current user has at least read
access. If the current user also has the private right, he can choose in the "filter" either "All" or "Private Only". That
means, he can choose between seeing all events or only the private events in this calendar.
At the top and at the bottom there are tools for choosing the
time period that is currently displayed on the calendar screen.
The "Import" and "Export" functionality is explained below.
The  symbol is the button for creating new events.
For investigating the details of an existing event, the user clicks on the event (either on the title of the event
or on the icon
in front of it), and the screen about changing events is displayed.
Matrix view:
Before creating meetings that involve other people and/or resources, the organiser wishs to see the free and busy times
of the involved people and resources. He can use the matrix view, which comes up when clicking the  button:

He can choose the day that should be investigated, and either the Free/Busy or the weekly mode. Furthermore he
chooses the potential participants. In the example, the Petra Team group and the mobile phone are selected.
This screen shot shows the free and the busy times of the members of the Petra Team, and the required resource:

The same request, but now in weekly matrix view:

If the events are not private and the current user has read access to the calendars of the other users, he can see the
details of their existing appointments by clicking on them.
creating new events:
There are two types of events: Either appointments that only involve the user, or meetings, that are attended by several users
or require one or more resources.
Private events should only be used with appointments, because private meetings don't allow the other attendees to see
the details or to accept/decline the invitation. Also resources should only be booked publicly. Otherwise even the
resource manager cannot deal with the request.
The screen for creating a new event looks like this:
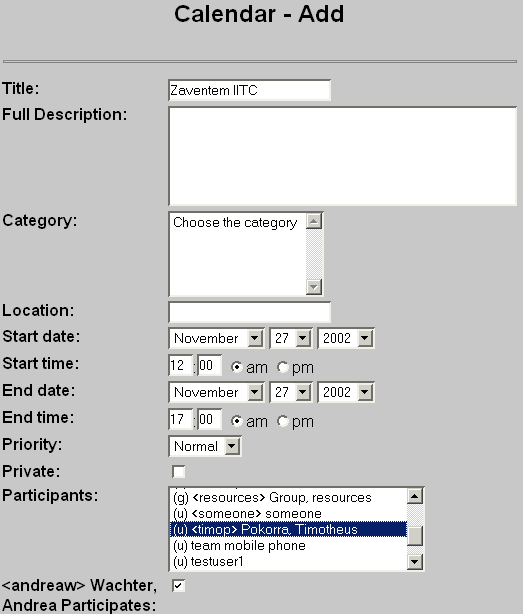
The organiser of the event can choose if she is also a participant in the meeting.
In this example, timop is also invited for this meeting.
If there are conflicts, a screen similar to this is displayed:

The organiser can ignore the conflict, or again edit the event.
Repeating events can be created by selecting some of the following attributes:
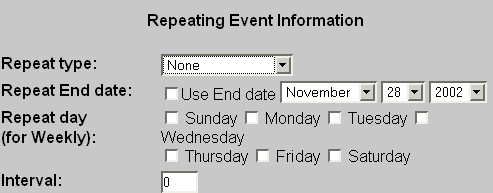
"Repeat Type" can have one of the following values: None, daily, weekly, monthly by day, or monthly by date.
An end date can be selected, at which the recurrence stops.
A day of the week can be selected for the weekly events, and an interval can be given.
changing events:
The user can click on the title of an event, and then this screen is displayed, if he has the necessary rights:
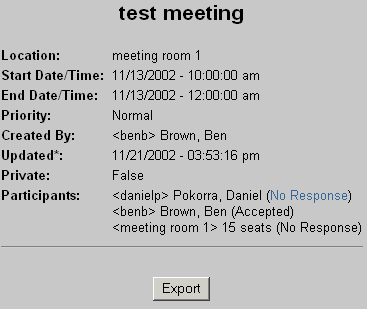
The details of the event will only be displayed if the user has read access.
If the user has rights for deleting or changing the event, the buttons for these actions are displayed.
There is the possibility for the export of the single event in iCalendar format.
Alarm management doesn't work yet.
If the current user was invited to a meeting, and he has not responded yet, he can click on "No Response",
to give his response in this screen:
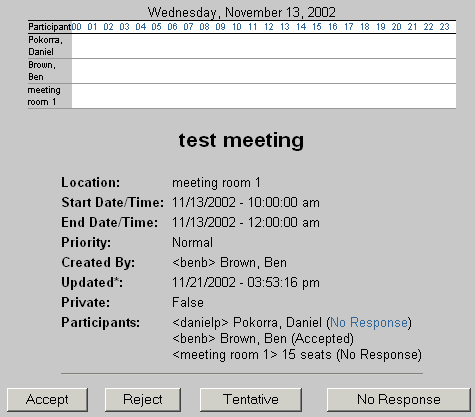
The possible responses are accept, reject, tentative, or leave it without no response.
He also can change his response later again, by using the "Accepted" link:

The screen looks different for recurring events: There is the choice of changing only
the single event or the series of events.

Import and export of calendar items
To import calendar items that were written by Outlook to a csv file, you can choose in this dialog your file from
your harddisk and upload it to the server. But: At the moment events can get duplicated if they have a changed date,
and participants are not correctly imported.
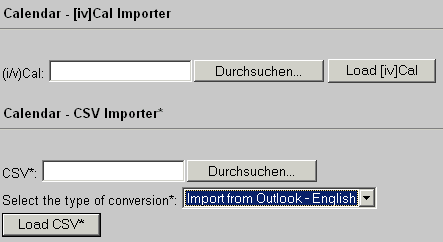
For export, you can choose the period of time when the calendar items should be exported to a CSV file. The file is downloaded
after a click on the submit button, and can be saved on the local harddisk.


 . Click this, and you see this screen:


 ), or show a complete week (
 ), or
a month (
 ) or a year (
 ).
In the example shown above, the calendar shows the week view.
 ) a daily matrix view can be displayed; see below for more information.
 ) also gives the possibity of showing the events of groups or single persons.
The categories are involved in that view, but we will not go into categories in this tutorial.
 symbol is the button for creating new events.


